 Hi everyone! It’s Gina here from Penny Sew Vintage, and I’m so excited to show you how to get the right fit for your Sash Swimsuit. Swimwear fitting is actually easier than you’d think, especially because swim fabric is forgiving with its stretch. I know I can kind of psych myself out of a project if I think fitting is going to be tedious or difficult, but I’m going to show you how simple it is to fit the Sash Swimsuit. Plus, this is a well drafted pattern which makes fitting so much easier!
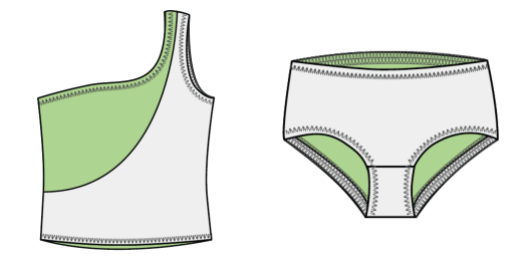
 If you don’t already have the Sash Swimsuit pattern, make sure you pick it up while it’s on sale so you can follow along. This swimsuit/leotard pattern is a single strap, asymmetrical styled suit that includes two flounce styles, color blocking, various sleeve lengths, modesty strap, and maillot or tankini options. It even has an asymmetrical hem view that would look amazing at a swim party!
Alright, let’s jump into fitting! To begin with, taking accurate measurements will ensure your child is wearing a suit that is comfortable and looks good. Once you have those measurements, you will turn to your Sash Swimsuit pattern and start comparing them to the size charts to figure out which sizes you’ll need to work with. The main measurements you will need to begin with are shown in a diagram on page 4 of your pattern, but basically height, chest, waist, hips, and trunk. Another measurement that is necessary because of the single strap is the neckline measurement, shown as H on page 5.
After you have all of your measurements handy, you will need to determine the primary swimsuit size, then alter that pattern size to your child’s measurements. Easy peasy, right?! Actually it’s not too bad, and I’ll show you two examples to help you see how to find the right fit. Since all bodies are different, even when selecting based on measurements, small fitting changes may still be necessary, so it’s always a good idea to make a test suit before cutting into that precious fabric you’ve been saving!
I also recommend making your practice suit using view A, mainly because all of the other suit styles can be adjusted from this view.
Now let’s begin!
Girl #1
My big girl is wearing view C with the optional strap. Her measurements are all over the place, like most girls are, but I’m going to show you step by step how I used her measurements to alter the Sash Swimsuit pattern to fit her perfectly.
Her measurements:
- Height – 45″
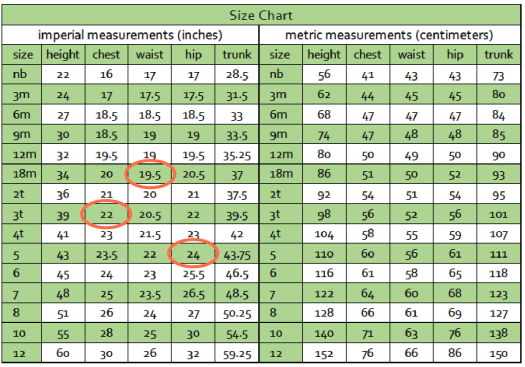
- Chest – 22″
- Waist – 19.5″
- Hips – 24.5″
- Trunk – 40″
- Neckline – 22″
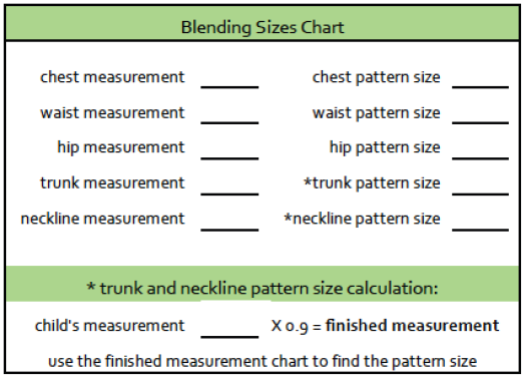
On page 6, very detailed sizing and pattern blending instructions are given. It can seem intimidating, but going slowly through them will help you save time and fabric in the long run, plus the pattern provides you with a little blending sizes chart!
From the pattern’s fitting instructions, I know that my primary suit size will be the largest of her chest/waist/hip measurements on the Size Chart on page 4. Her hips are her largest size which makes her primary suit a size 5. Then taking the rest of her measurements into consideration, her chest will be size 3 and waist 18 months.
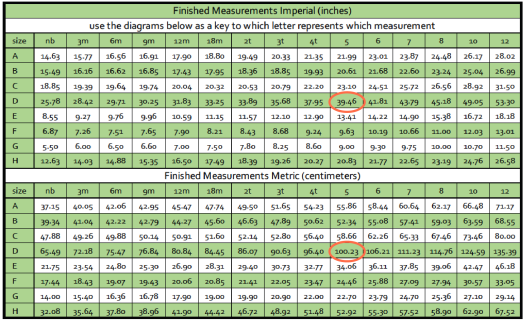
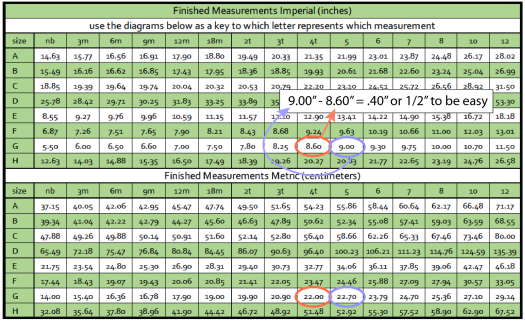
Now, I’m not going to stop here because trunk size is very important. For example, my girl is a size 6 for height, but her trunk measurement is only 40″. Instead of taking her trunk measurement and looking at the size chart, I decided to look at the finished measurements chart on page 5. Since swimsuits rely on negative ease (typically smaller measurements than the child’s actual measurements) to fit well, we want to find a finished trunk measurement either just at or smaller than our actual trunk measurement. I look at row D to find a finished trunk around 40″ (which is my girl’s actual measurement), and I see that size 5 has a finished trunk measurement of 39.46″, exactly what I’m looking for.
Just a quick side note about trunk fitting. If I followed the pattern’s fit instructions (to multiply 40″ by .9), this would put my girl in a size 3, but I know that my girl tends to grow up quickly and not out, so this suit will fit her for awhile as well as look good on her now. You can definitely use the size the pattern’s fit instructions give you too for the trunk, but with swim fabric, there’s sometimes a bit of wiggle room there for growth. I wouldn’t want to go bigger than her trunk measurement though, or the suit would sag and not fit properly at all.
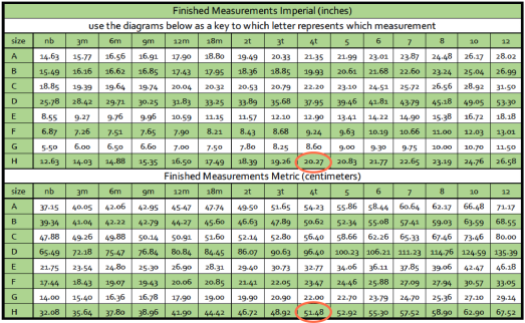
Next I want to take a look at the finished neckline since we have the single strap and we want to keep the suit up and the chest covered! Based on my girl’s neckline measurement of 22″ and multiplying that by .9 (according to the Blending Sizes Chart from page 6) I get 19.8″, then looking at H on the Finished Measurements Chart, size 4T looks like the best match for her.
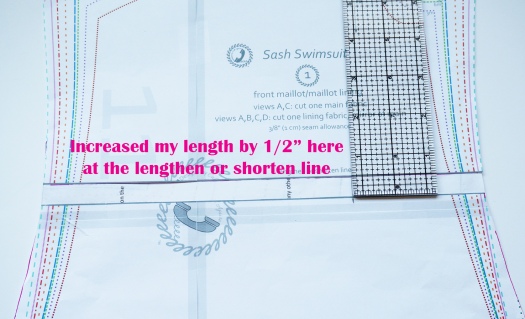
Finally, we want to calculate how much to lengthen or shorten the pattern with all of these size differences. I want a size 5 trunk length, so I need to subtract the finished measurement of strap 4 length from 5, G on the Finished Measurements Chart (remember I have a size 5 primary suit, but a size 4 strap when blending my pattern sizes). When I take 9″ and subtract 8.6″ I find I will need to lengthen my suit pattern .40″ at the lengthen/shorten line. I added 1/2″ to make it easy.
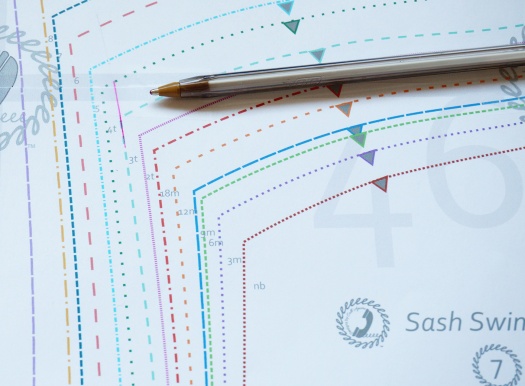
Now let’s take all of this over to the pattern and see how I made these changes. First, I follow the line from the size 3t waistline up through the 3t chest and continue on to the size 4 neckline, where my pen is pointing (even though my measurements above gave me an 18 months size for my waist, I decided to go with a 3t because her tummy expands a bit when she eats, and the size difference between these two really isn’t a big deal for fit at the waistline).
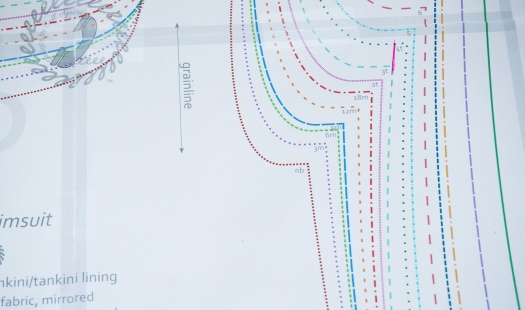
I follow across the 4 neckline and shoulder strap, then back down to the 3t chest line. You can see the only thing that I’m actually changing is just where the size 3 chest meets the size 4 underarm.
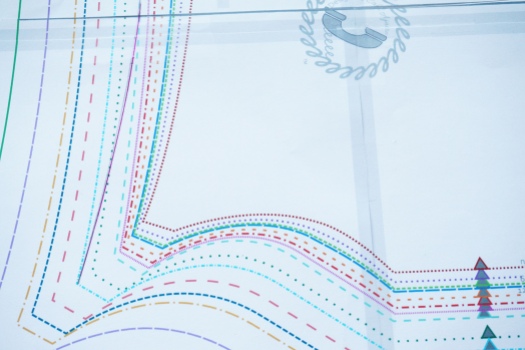
I follow down the 3t chest and waist, and came out to the 5 hips and bottom, since 5 is my primary suit size. Here is where I’m actually drawing a curved line, trying my best to keep the angle shape. If you have a hip curve ruler, this will help keep it accurate. You can see my curved line start from size 3 at the waistline and curving down to size 5 at the bottom left.
I cut my suit pattern out at my drawn lines, then I cut it again at the lengthen/shorten line and added the 1/2″ length there. I smooth out the lines at the sides afterwards.
Voila! I have my great fitting suit!
I used a size 4 flounce and optional shoulder strap because I have a size 4 neckline.
Regarding the elastic, the only actual change I made was to the strap arm hole, so I just averaged the difference between the size 3 and 4 elastic measurements for that and got a great fit.
Girl #2
My little one wants me to make her views F and I. Her measurements are much more straightforward without too many changes, and because it’s a tankini, the trunk measurement isn’t as crucial as it is for the maillot.
Her measurements:
- Height – 37.75″
- Chest – 19.75″
- Waist – 19″
- Hips – 21″
- Trunk – 35.375″
- Neckline – 18.25″
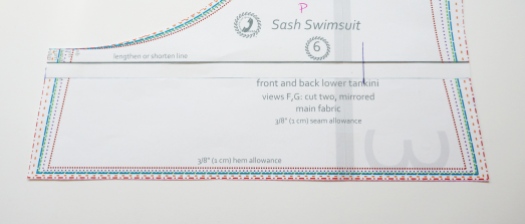
Her hip measurement is her largest size, so her primary suit size is 2t, plus based on the finished trunk measurements, her trunk size is also a 2t. Her waist, chest, and neckline measurements put her into size 18 months. I will need to add some length to the top, so I calculate the difference between the finished strap measurements (G) for sizes 18 months to 2t and will need to increase my length at my lengthen/shorten line .3″, or 3/8″ to make it easy.
I also make changes to the lining piece too.
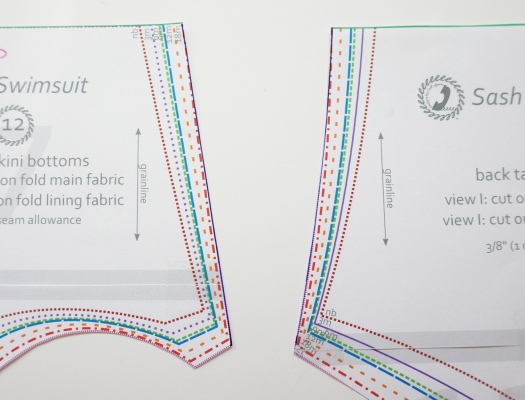
Her waist is 18 months and her hips are a size 2, so I will draw a line from the 18 months waistline to the size 2 hips, using the size 2 primary suit size for the bottoms patterns. That’s all, and she’s ready to go! I don’t even need to alter any elastic lengths for her; I’ll just use 18 months for the waist and 2t for the leg holes.
I’m excited to sew up her suit next, and I’m warning you, sewing these swimsuits is so fun, you’ll just want to make more! If you’re feeling like you can totally tackle this swimsuit sewing, then you might be interested in the Classic Maillot pattern as well which is also half off for Swim Week. Also don’t forget about the free Classic Maillot SwimSkirt pattern too which you can add to either the Sash Swimsuit or Classic Maillot patterns.
Happy fitting everyone and don’t forget to share your swimsuits in the Designs by Call Ajaire Facebook group or tag #designsbycallajaire on Instagram!






Leave a Reply